Sunday, June 1, 2014

Month 16: Compositing and Scene Finishing/Visual Effects 2

JOY! This was my last month of being on an accelerated schedule. From here on out, its only 1 class a month. I only have 1 more class before I start my 5 months of finals and portfolio creation.  The specialty I have decided on is going to be shading and lighting. While I also considered modeling and visual effects, I feel like with shading and lighting I can model my own scenes and spice them up with some effects.

Alright so this month we had our second composting class, and our second visual effects class. Ill talk about COMPOSITING and SCENE FINISHING first.

(still frame from project 4...ITS ME)

So just to recap what compositing is ... this is the trade of combing film/cg elements. When you see in movies all the cool stuff they do with green screens and adding backdrops that blend seamlessly into the shot... that all falls under composting. I am no master at it yet.... but learned heaps about it this month. 

We had 4 projects in CSF

Project 1 (welcome back to nuke)
Nuke is an extremely expensive piece of software that is very powerful, and very widely used in film. Our first project was already half done for us... our job was to recreate it an expand on it. This project was designed to re-familiarize us with the software.

We had to take an already rendered out sequence (with passes) and build it into an interesting sci-fi scene.

So we got this.................(PROJECT 1)
The person in the suit is actually an intern currently at Full Sail.

From this rendered out sequence, we extracted out several passes I will show below

 Occlusion

 Reflection


 Refraction


Diffuse


UVs

Alright so Using these passes and the magic of Nuke we were given some creative control to customize our shot.... After a lot of tweaking and playing this was mine.
I did all the textures/ the flame pattern and such. Here is what the final product looked like


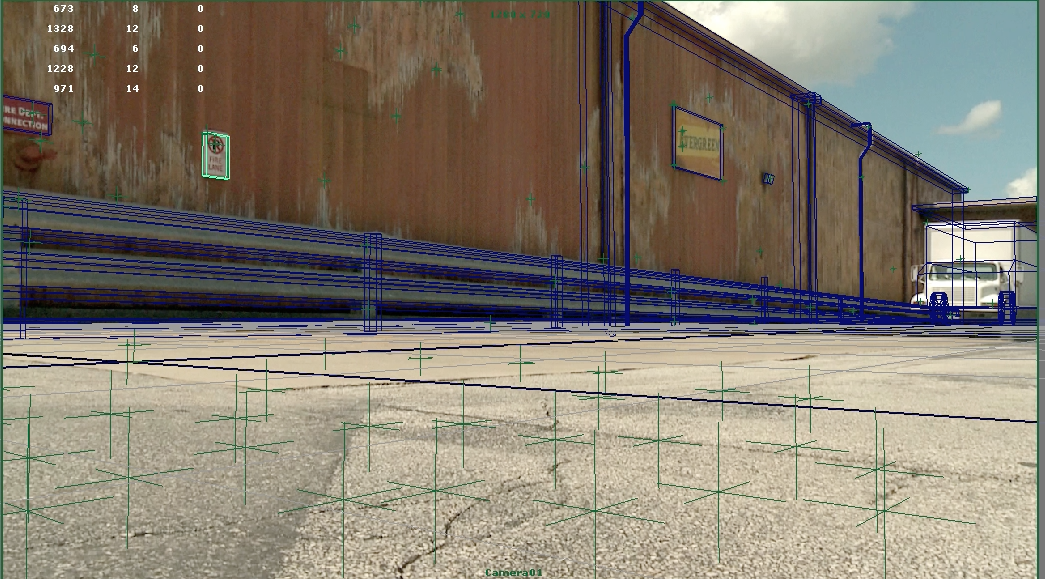
Our next project was a tracking project in new software called syntheyes. (PROJECT 2)

For this we took a video clip and tracked it
this is just 1 frame. The small green markers you see will track their spots as the camera moves and from these trackers we can rebuild our scene in 3d
you can see the blue geometry that I built that is matched to the scene. This is used all the time in movies when they have to add cg elements to footage. We just did the tracking for this project.... here is the video to maybe aid what I am talking about.

For PROJECT 3 we did the same project we did for project 1 but this time in class we filmed each of our faces moving around, we then tracked our face footage, we then attached the already build armor suit model to our face, and then composted it into a scene.

this is face footage after tracking.... notice how cool I look with the CG bane mask.

Here is a still shot after I had finished attaching the movie tracking data to the armor


This was the Final Composite after everything....


For our final project (Matte Painting) we paired up with the film students. We were to take an establishing shot from their project and create a matte painting for it based on their instruction. This was what my shot looked like when its spread out into one image.

here is the actual video shot


The film students wanted
-all the stuff to the right of the building gone, they wanted it replaced with a French quarters style street.
-they wanted kind of an industrial city in the background
-they wanted a 3rd story added to the building
-They wanted it to look kind dirty with trash and have grafitti on the building
-They wanted the time of day to be the morning.

This is how my matte painting looked when I was done with it

here is the final shot
You cant really tell from the uploaded video quality but the tree leaves are moving as well as the clouds. The buildings in the background are also separated a bit from the foreground to give it some depth.

There is definitely a few issues with it, but I am pretty pleased for my first matte painting.
So that was it for CSF.

------------------------------------------------------------------------------------------------------------------------

The other class I took this month was Visual Effects 2.


(still frame from project 3)

Visual Effects 2 had us working on three projects.

The first project was to find a video of a fire and to try and simulate that fire using maya fluids.

Here was a work in progress picture

Here is a still shot from the final


 and here is the final simulation after rendering.


 After project 1 we started working with Houdini. Here are some clouds I believe we created in Houdini.


For our second project we had to simulate a pyro effect in Houdini. I found a vool video of a volcano erupting and I tried to recreate the smoke plume


The render
 

For our final project we were gave complete freedom to research anything we wanted and to create a simulation. I took this as an oppertunity to install a trial version of Realflow and play around with it. Realflow is mostly for fluid simulation.  

I found realflow to be really cool, here is a few of the tings I did in a short period of time.


full simulations


That is all for this month!... I am going to use my free time off this coming month to prepare for finals. 

Friday, May 2, 2014

Month 15: Character Animation 2/Software Technology/shading and lighting ART TEST

       Another month down as I head into my last month with 2 classes. Its exciting, because Ill finally have time to start practicing my discipline, and preparing for the 5 months of finals! So this month started out being the most challenging month I have had to date, because along with my 2 classes I was taking an art test.
When I say art test, it is not a test that can be done in an hour or two, it is a project that would absorb 15-30 hours each week depending on how much time I had... both my classes this month were 3 days a week, so that plus the art test made for a challenging month.

Alright so first I had CHARACTER ANIMATION 2
(still frame from final lip-sync project)

This class was the continuation of CAN1 from 2 months back. In this class we continued to build off what we learned in all of our previous animation classes. There were 2 major projects, and a practical. The practical was done on our first lab, and we had to animate a walk cycle. We used a skeleton rig and had about 3 hours to finish it. It was basically to refresh us on how to animate within Maya, and to refresh us on the walk cycle.

I do not have the video, but here is a still shot of the skeleton rig we used.
(skeleton rig from practical)

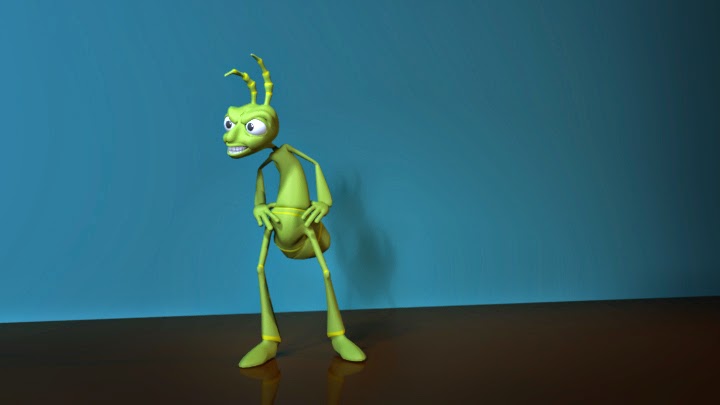
Our first major project was to animate an emotion change using the familiar bug rig. This project is really the first project where we dived into facial expressions more in depth. We were provided a list of ideas to choose from. I chose the idea of coming home to discover my pet fish had died.

In class we filmed our ideas by acting them out to use as reference. We then had to work on some pre production drawings, and develop a back story for our character. Here were some of my drawings.
Started getting a lot more comfortable animating with this project and learned a lot about anticipations.

Still Frame


                                                        (final animation rendered out)

So I took some time to light this, and render it out. Blogger is destroying the quality so just image it like it is in the image above. I see a lot of mistakes in it now, but I guess that's a good thing.

The final project we worked on was a voice over animation. We chose one from a bunch of sound clips from movies, and created an animation/lip sync around that.  This helped us learn all the shapes our mouths make when we talk. Again we had to develop a back story and do some pre-production drawings.


Once I had finished the animation I actually looked up the sound clip to find out it was from "Million Dollar Baby." After hearing it about 1000 times while doing this animation I was curious.

So again we acted these out in person and recorded them to use as a reference. I used the video of me to get my timing correct, I then played with the animation to make it more interesting.

Still render from final animation

Here is an early milestone when the scene was just getting blocked out

                                                           (early work in progress)


Here is the final after I lit and rendered it
                                                    final lip sync(TURN ON AUDIO)

All in all, I was pretty pleased with the progress I have made as an animator. I'm not exactly at Pixar level, but I feel like I came a long ways.

-----------------------------------------------------------------------------------------------------------------------

The other class this month was SOFTWARE TECHNOLOGY

Software tech tries to push some other software on the students to get them outside of their Maya comfort bubble. The software that we were exposed to is Soft Image, and Houdini.

Within those two programs the class focused on modeling, procedural modeling, and some dynamics/visual effects simulations.

In SoftImage we modeled a vehicle. Most people did cars, I did a WW2 plane. Because of the demands of my other class/test I kept the modeling detail to a minimum, also we were doing it in software that was very unfamiliar.
We also modeled a fence that we used in a later project.

Houdini seems to be a very powerful program, with very powerful visual effects tools. While we spent a majority of the month working in it, I can tell we barley scratched the surface.

In Houdini we started out doing some procedural modeling... here is a few of the projects we worked on
(soccer ball model)

One of the first simulations we worked on. All these domino s were not modeled individually but duplicated along a curve and then randomized. Dynamics and gravity was then added to make the simulation work. I don't have any videos, but I think the idea is expressed.


For this simulation we took the vehicle we created and crashed it through a wall. This probably would have been cooler with the video =(


After we modeled the fence, we brought our model into houdini and set it up so we can adjust its size, length and shape, and the fence will actually generate however we wish, and along whatever path.

One of the last projects we worked on in Houdini, this earth crack simulation actually animated along a curve we drew. We turned this simulation into a customizable tool we could customize the look and feel of the simulation.

Houdini is a node based program, so to build this simulation we built out a giant tree of nodes that looked something like this.
 Houdini seems to be pretty technical, and has a pretty steep learning curve (at least for me) but there seems to be endless possibilities for a skilled user.

------------------------------------------------------------------------------------------------------------------------

ART TEST shading and lighting.

Alright so on top of my classes that went 6 days a week, I also took the shading and lighting art test this month.

As computer animation students we are required to pass one of the 6 art tests before we can peruse that discipline for our demo reel.

The 6 disciplines are

Modeling - Shading and Lighting - Rigging - Visual Effects - Animating - Compositing

so we get 3 attempts in each discipline, each test takes 1 month, if we can not pass the test by the 3rd attempt we have to choose another discipline and try to pass its test.

I am interested in Modeling and Shading and lighting so I thought I would take the SaL one this month.

For this test we were provided a reference image of a room as well as the model for the room. We had to match the lighting of the room as well as all of the materials and textures seen though out the room.

Each week we submitted our renders and were graded, and provided with feedback for things we need to work on by the art director. This is all done online. The grading is pretty strict, and it seems like a lot of people were not making the cut the first time around.

I will show each weeks Side by Side image so you can compare, the difference are probably pretty subtle if you don't stare at this things for hours on end like I was.

WEEK 1 Submission - I really only had 1 night to work on this one. This was after about 12 hours.

(mine LEFT/ reference RIGHT)
This one had some big lighting issues as you can see its pretty blown out around the doorway. There were loads of other subtle problems but I am not gong to go through them all

WEEK 2 Submission - After putting 20-30 more hours into it.
(mine LEFT/ reference RIGHT) 
Was much happier with this turn in only had some minor issues after this

WEEK 3 Submission - Getting even closer
(mine LEFT/ reference RIGHT)
Thats IT! There was supposed to be a final turn in for week 4 but the Art Director actually pushed me through and APPROVED me early =) This was pretty awesome news. I cant express the work that and learning that went into this with just these 3 pictures, but I might as well have took a whole class for how much I learned while working on this.

I might take the modeling test in June, I am not sure yet, I am really liking the lighting and texturing process.

---------------------------------------------------------------------------------------------------------------------------

Side Project Stuff

During spring break time frame I got a bit more work done on my character, here is some more work in progress pics.

                                                                  (Reference Image)
Pretty sure the internship expired, but I am still pushing to finish this.

Next month I have Visual Effects 2 and Compositing 2! Last month of 2 classes!!!

Saturday, April 12, 2014

Month 14: Visual Development/Motion Capture

Two thirds of the way through the program, and seven months left! I have 2 more months of having  2 classes a month, then Ill be starting on my portfolio months so things will get less hectic.

This month I took visual development and motion capture. Visual development is expanding off  one of my earlier class (shading and lighting), and focuses on creating realistic lighting, and realistic textures. Besides modeling, this is one of the other things I really love doing so this class was pretty exciting for me.

The other class was motion capture. When you see the behind the scenes in movies and they are in tight suits covered in reflective balls, and using the data recoded from the ball movement to animate CG characters......... that's motion capture.

VISUAL DEVELOPMENT

my final project VSD 1403 (models done by school)

So we had 4 projects in VSD
For the first one we learned a lot about creating lighting, matching shadows, and matching light angle and color. We were gave a scene and am image of that scene lit and told to try and match the lighting.

Im not going to bring in the reference image that was provided but it looked pretty much just like my render seen here.


For the next project we had to UV a few models. This means we to convert the surfaces of our models into a cleanly readable image so we can texture it. Here is an example of what a UV map looks like for a gear piece
 

Its kind of a long and tedious process but if done well it can help create really nice textures.

After that we had to use Photoshop and photographs to create a map for our gears texture using the UV map that we made... here was mine


Once all that is done we can get a render like seen on my final render.

For our third project we worked on layered textures as seen on the box, as well as learning aboiut refractions and caustics, seen in the bottle. A lot of work went in to each of these textures, here is an example of just the boxes network


 ...and thats why everyone is not as fond of shading and lighting as me.^

Here is the bottle by itself


I put in a particle system for the bubbles. If you look closely you can see the caustics effects in the orange lighting under the bottle.

Here is what everything looked like in maya before adding textures and lighting
... so that was VSD,... it was pretty awesome

-----------------------------------------------------------------------------------------------------------------------
MOTION CAPTURE

Next was motion capture. Motion capture, as explained above is when you gather motion data from people, plug the numbers into a computer, and apply it to a CG character. It was A LOT to take in over just one month and most of the month focuses on a 3 man group project. The the project you create a short 20-30 second story, caption the motion data for it, clean up all the data, convert that data and apply it to a character rig, then finally put your character into a scene that we had to build, create all the camera shots, render it all out, then edit the movie. It was a LOT to do even for three people.

Here is the granny character from our scene.


 Our group worked well together and we all did a little of everything. One of my major contributions was modeling the entire scene and lighting it.


Here was the final product. It may not seem super impressive, but for the time we had, we were pretty happy with it.

Here is what our classroom looked like for the class and our group member Alberto, in the capture suit. Notice he is being mirrored on the projector in the background.

So that was March! Next month is going to be possibly my most busy month yet, as I am taking 2 classes that are both 3 days a week each as well as an art test that ill talk about next month. Basically I am taking three classes.

-------------------------------------------------------------------------------------------------------------------------
Side Project

So there is an internship in Bellevue at a game company that requires you to model a character for their art test. This is the reference picture that they provided. 
 So for about 2 months whenever I get a day off (not very often) I have been working on it. Here is some work in progress pictures.


I don't know if I will complete it on time, (there is no noted deadline) but I would like to get through the entire process.
Ill post any updates in my next post.